⌘K
PS
Help Center

How-To Guide

How-to guides and real screenshots for every feature in OwnExpense.

Getting started with OwnExpense

OwnExpense is your AI-native spend and expense platform: capture receipts through any channel, let policy and fraud agents pre-check every expense, route only the exceptions for human approval, settle reimbursements on the fastest payment rail, and keep budgets, vendors, travel, taxes, and multi-entity books close-ready in real time. This guide walks through every screen with real steps and screenshots β€” no onboarding session required.

Orientation β€” the things to know first

  1. 1The left sidebar is your primary navigation. It is grouped into Overview (Dashboard, Analytics), Spend (Expenses, Approvals, Cards, Reimbursements), Plan & Travel (Budgets, Travel, Vendors), and Control (Policies, Compliance, Entities, Integrations). The current page is highlighted.
  2. 2The top bar holds an entity switcher on the left (switch between legal entities or view All entities), a universal search box that searches expenses, vendors, and people β€” and answers OwnIQ questions, a New expense button, the OwnIQ sparkle shortcut, a notifications bell, and your account.
  3. 3Most list pages share the same layout: a title with a description and primary actions on the top-right, a filter/search bar, and a table or cards below. Click a row to open its detail view.
  4. 4Almost every expense is policy-checked automatically in under 200ms. Green means in-policy, amber is a soft flag for review, and red is a hard block.
  5. 5Open this Help guide anytime from the "Help & Docs" link at the bottom of the sidebar.
  6. 6New here for the AI? Start with the "AI Agents" category below β€” it covers what the agents do, how to drive them in plain English, and how to verify their results.

AI Agents

Drive OwnExpense in plain English β€” and use the in-app AI (OwnScan, PolicyAgent, OwnIQ) directly.

AI Agents β€” overview

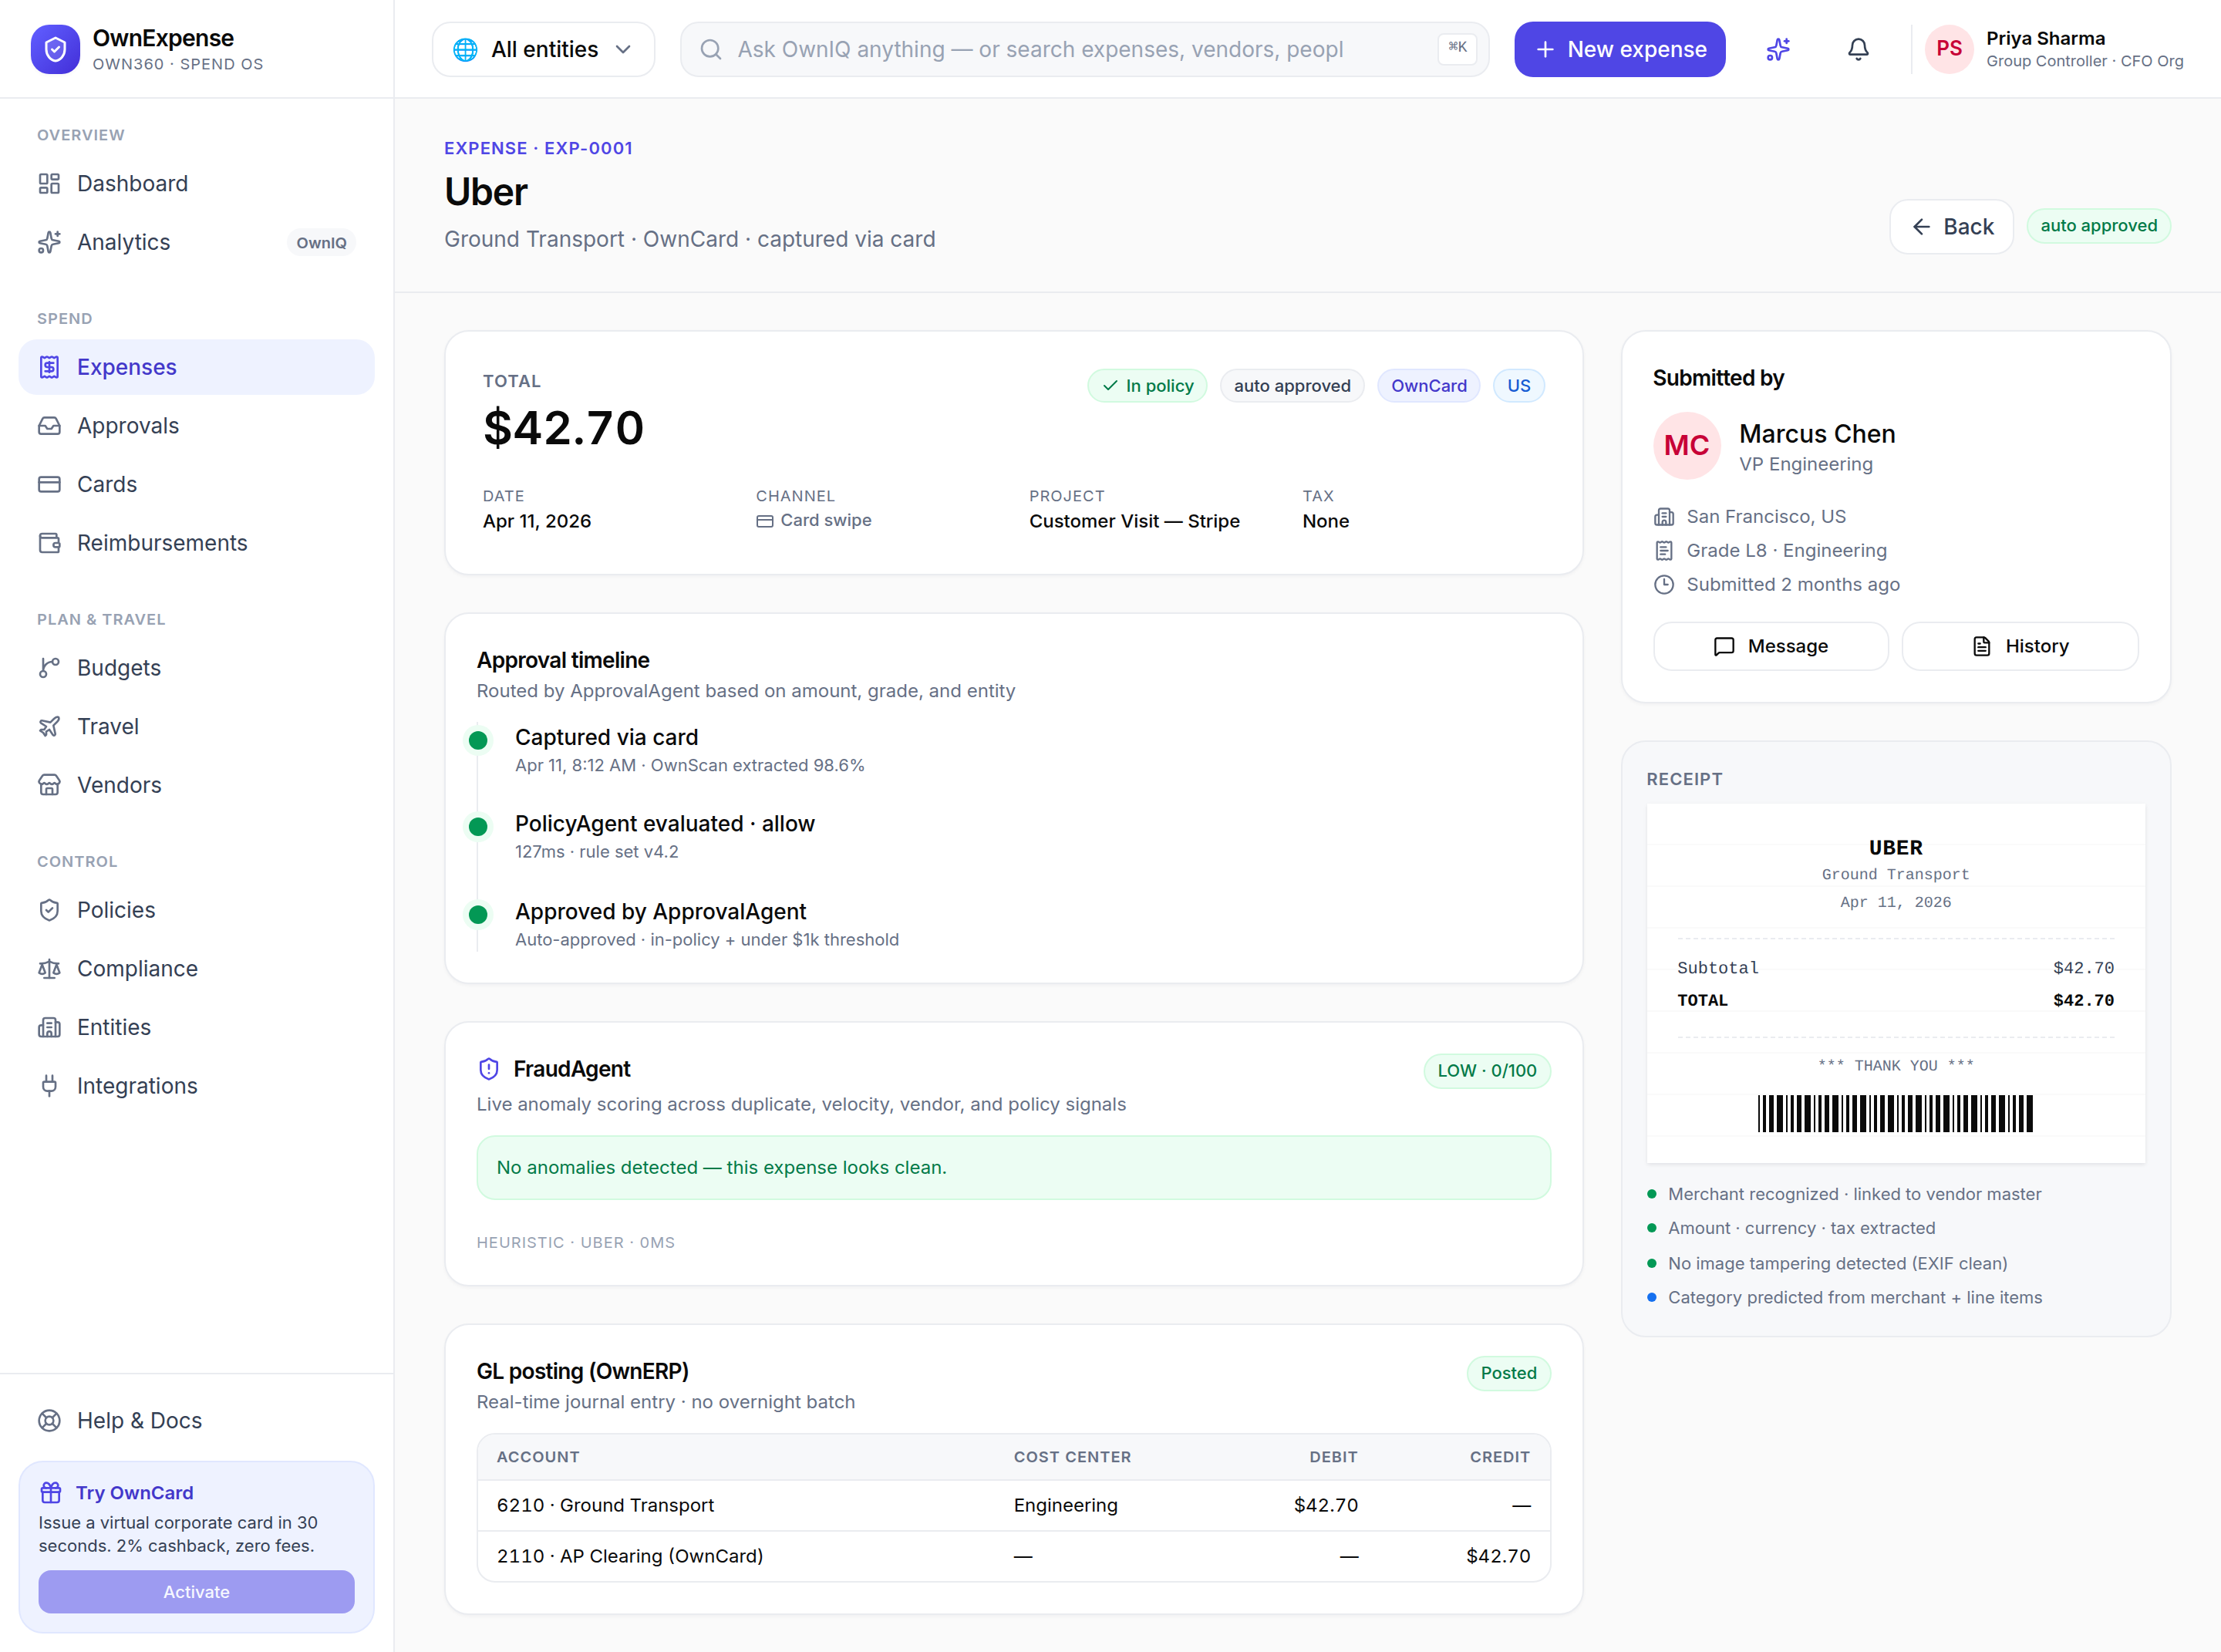
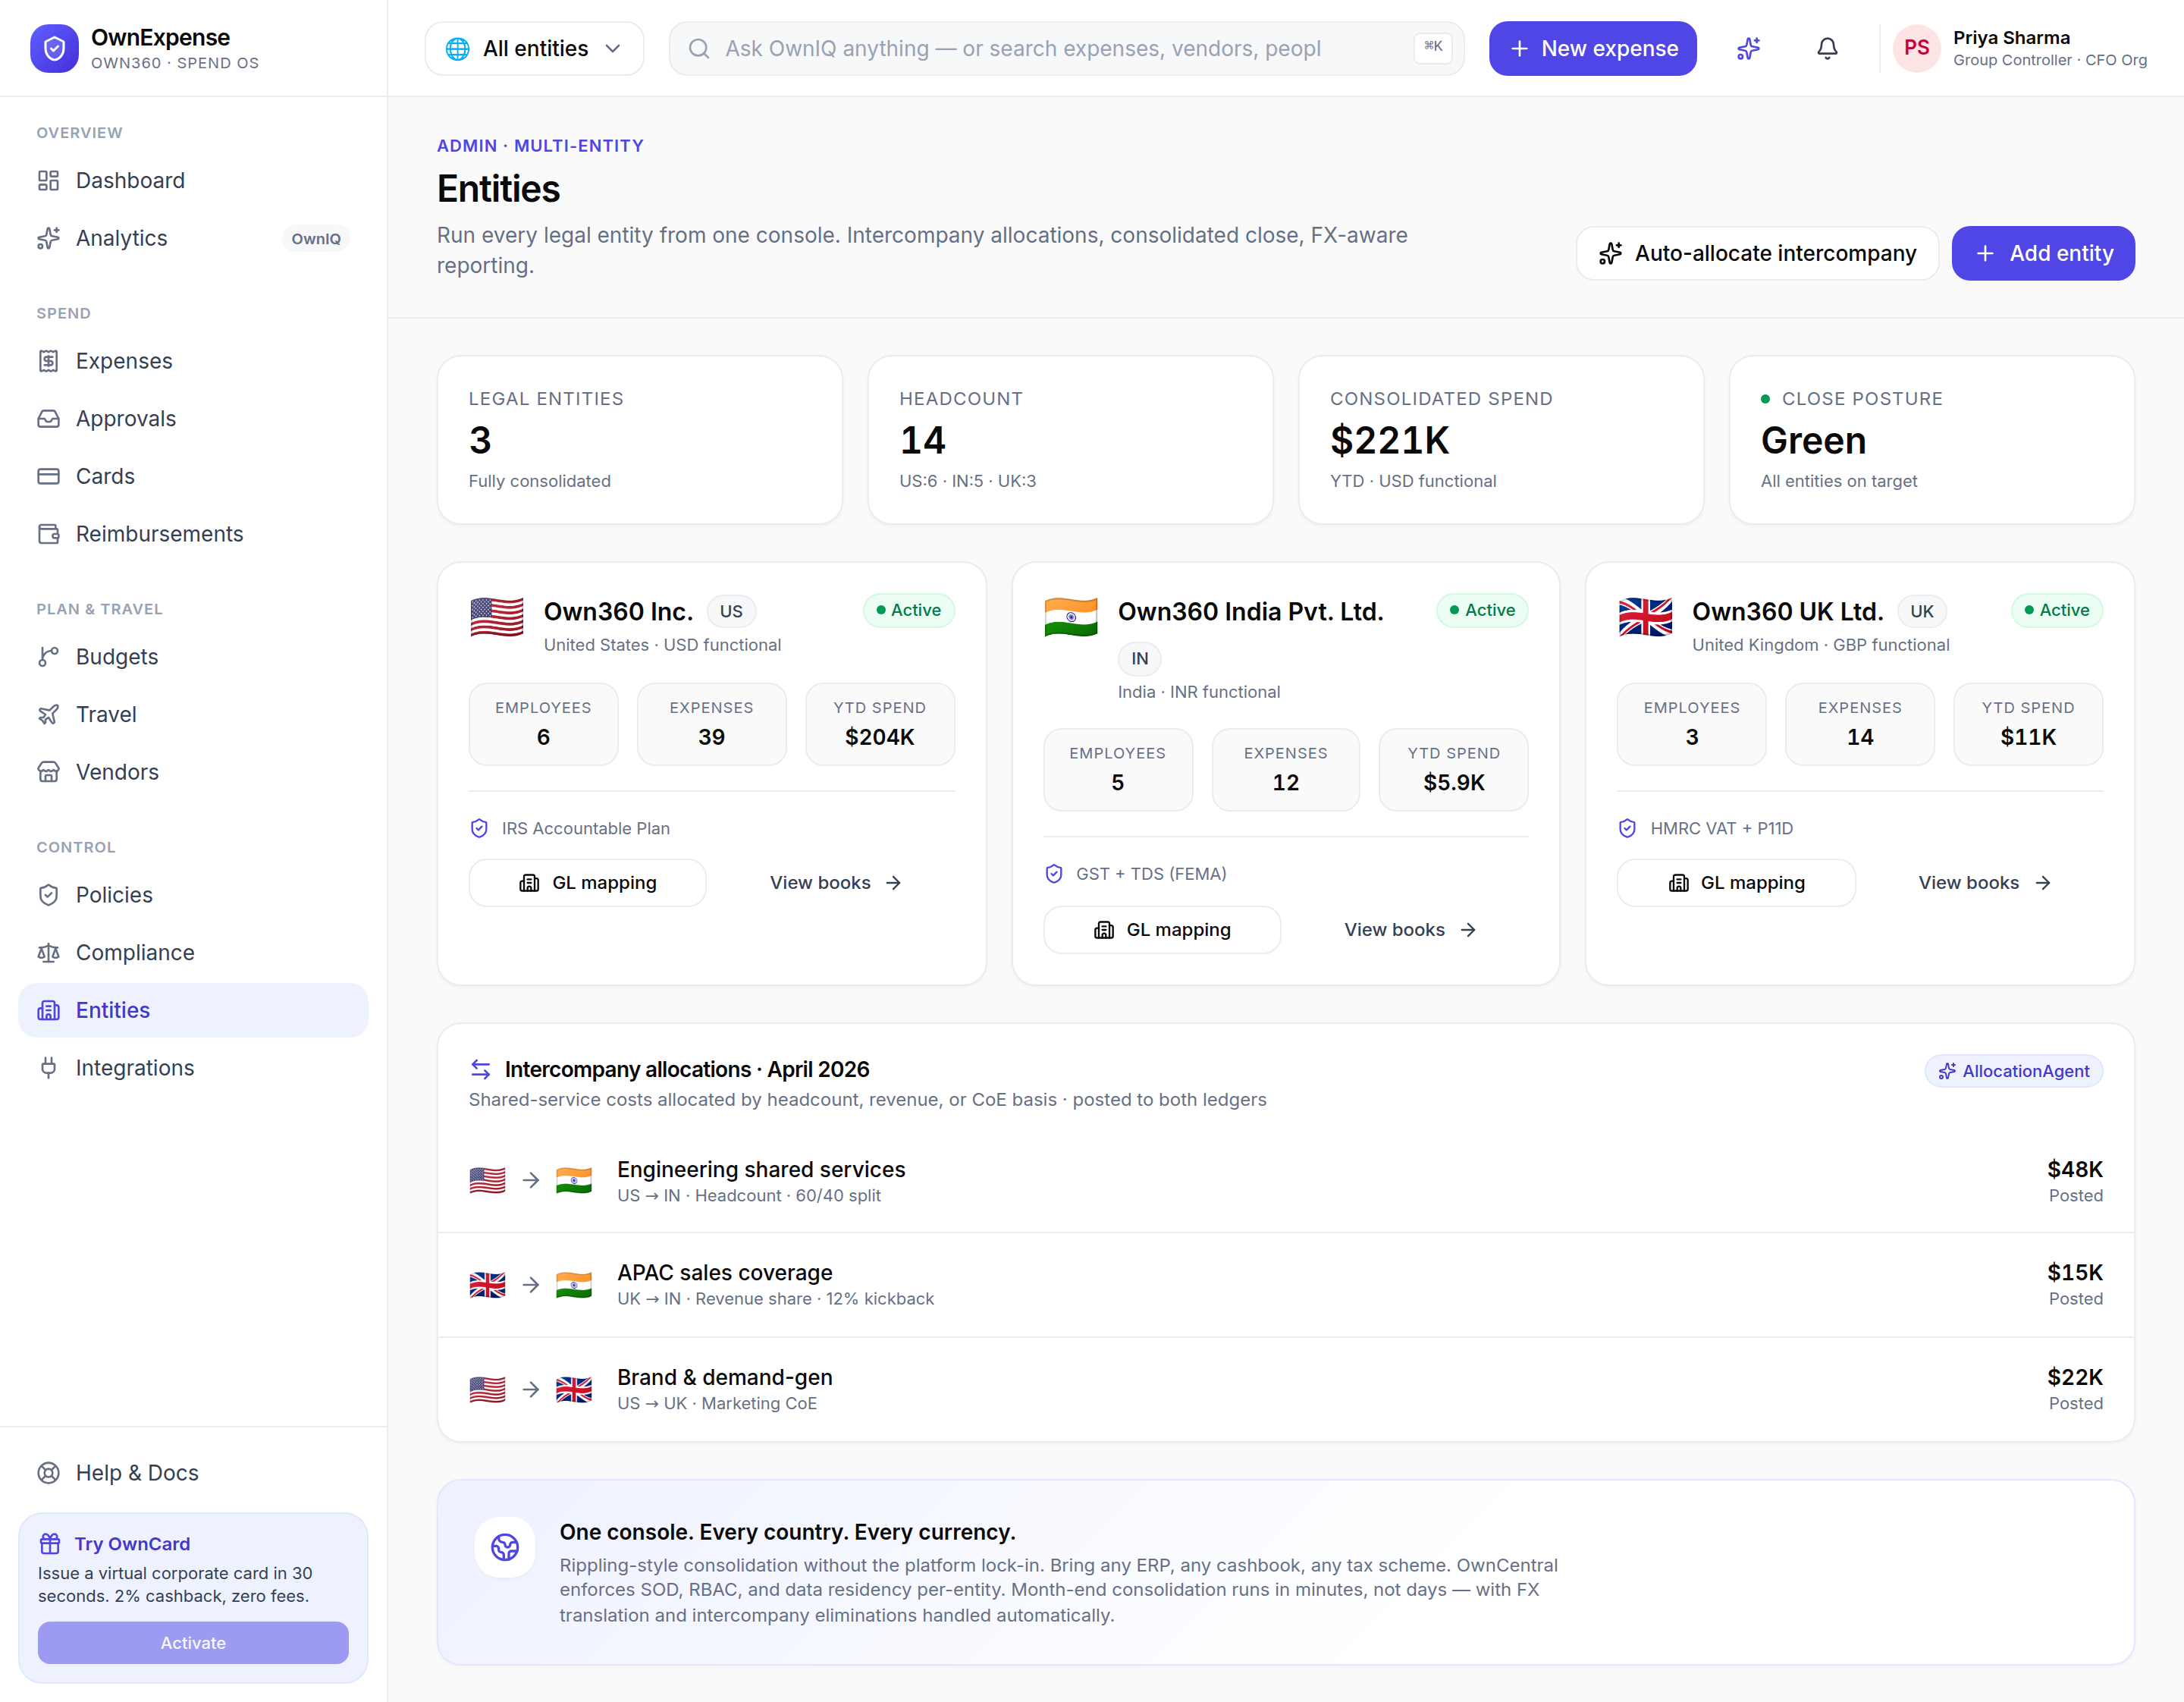
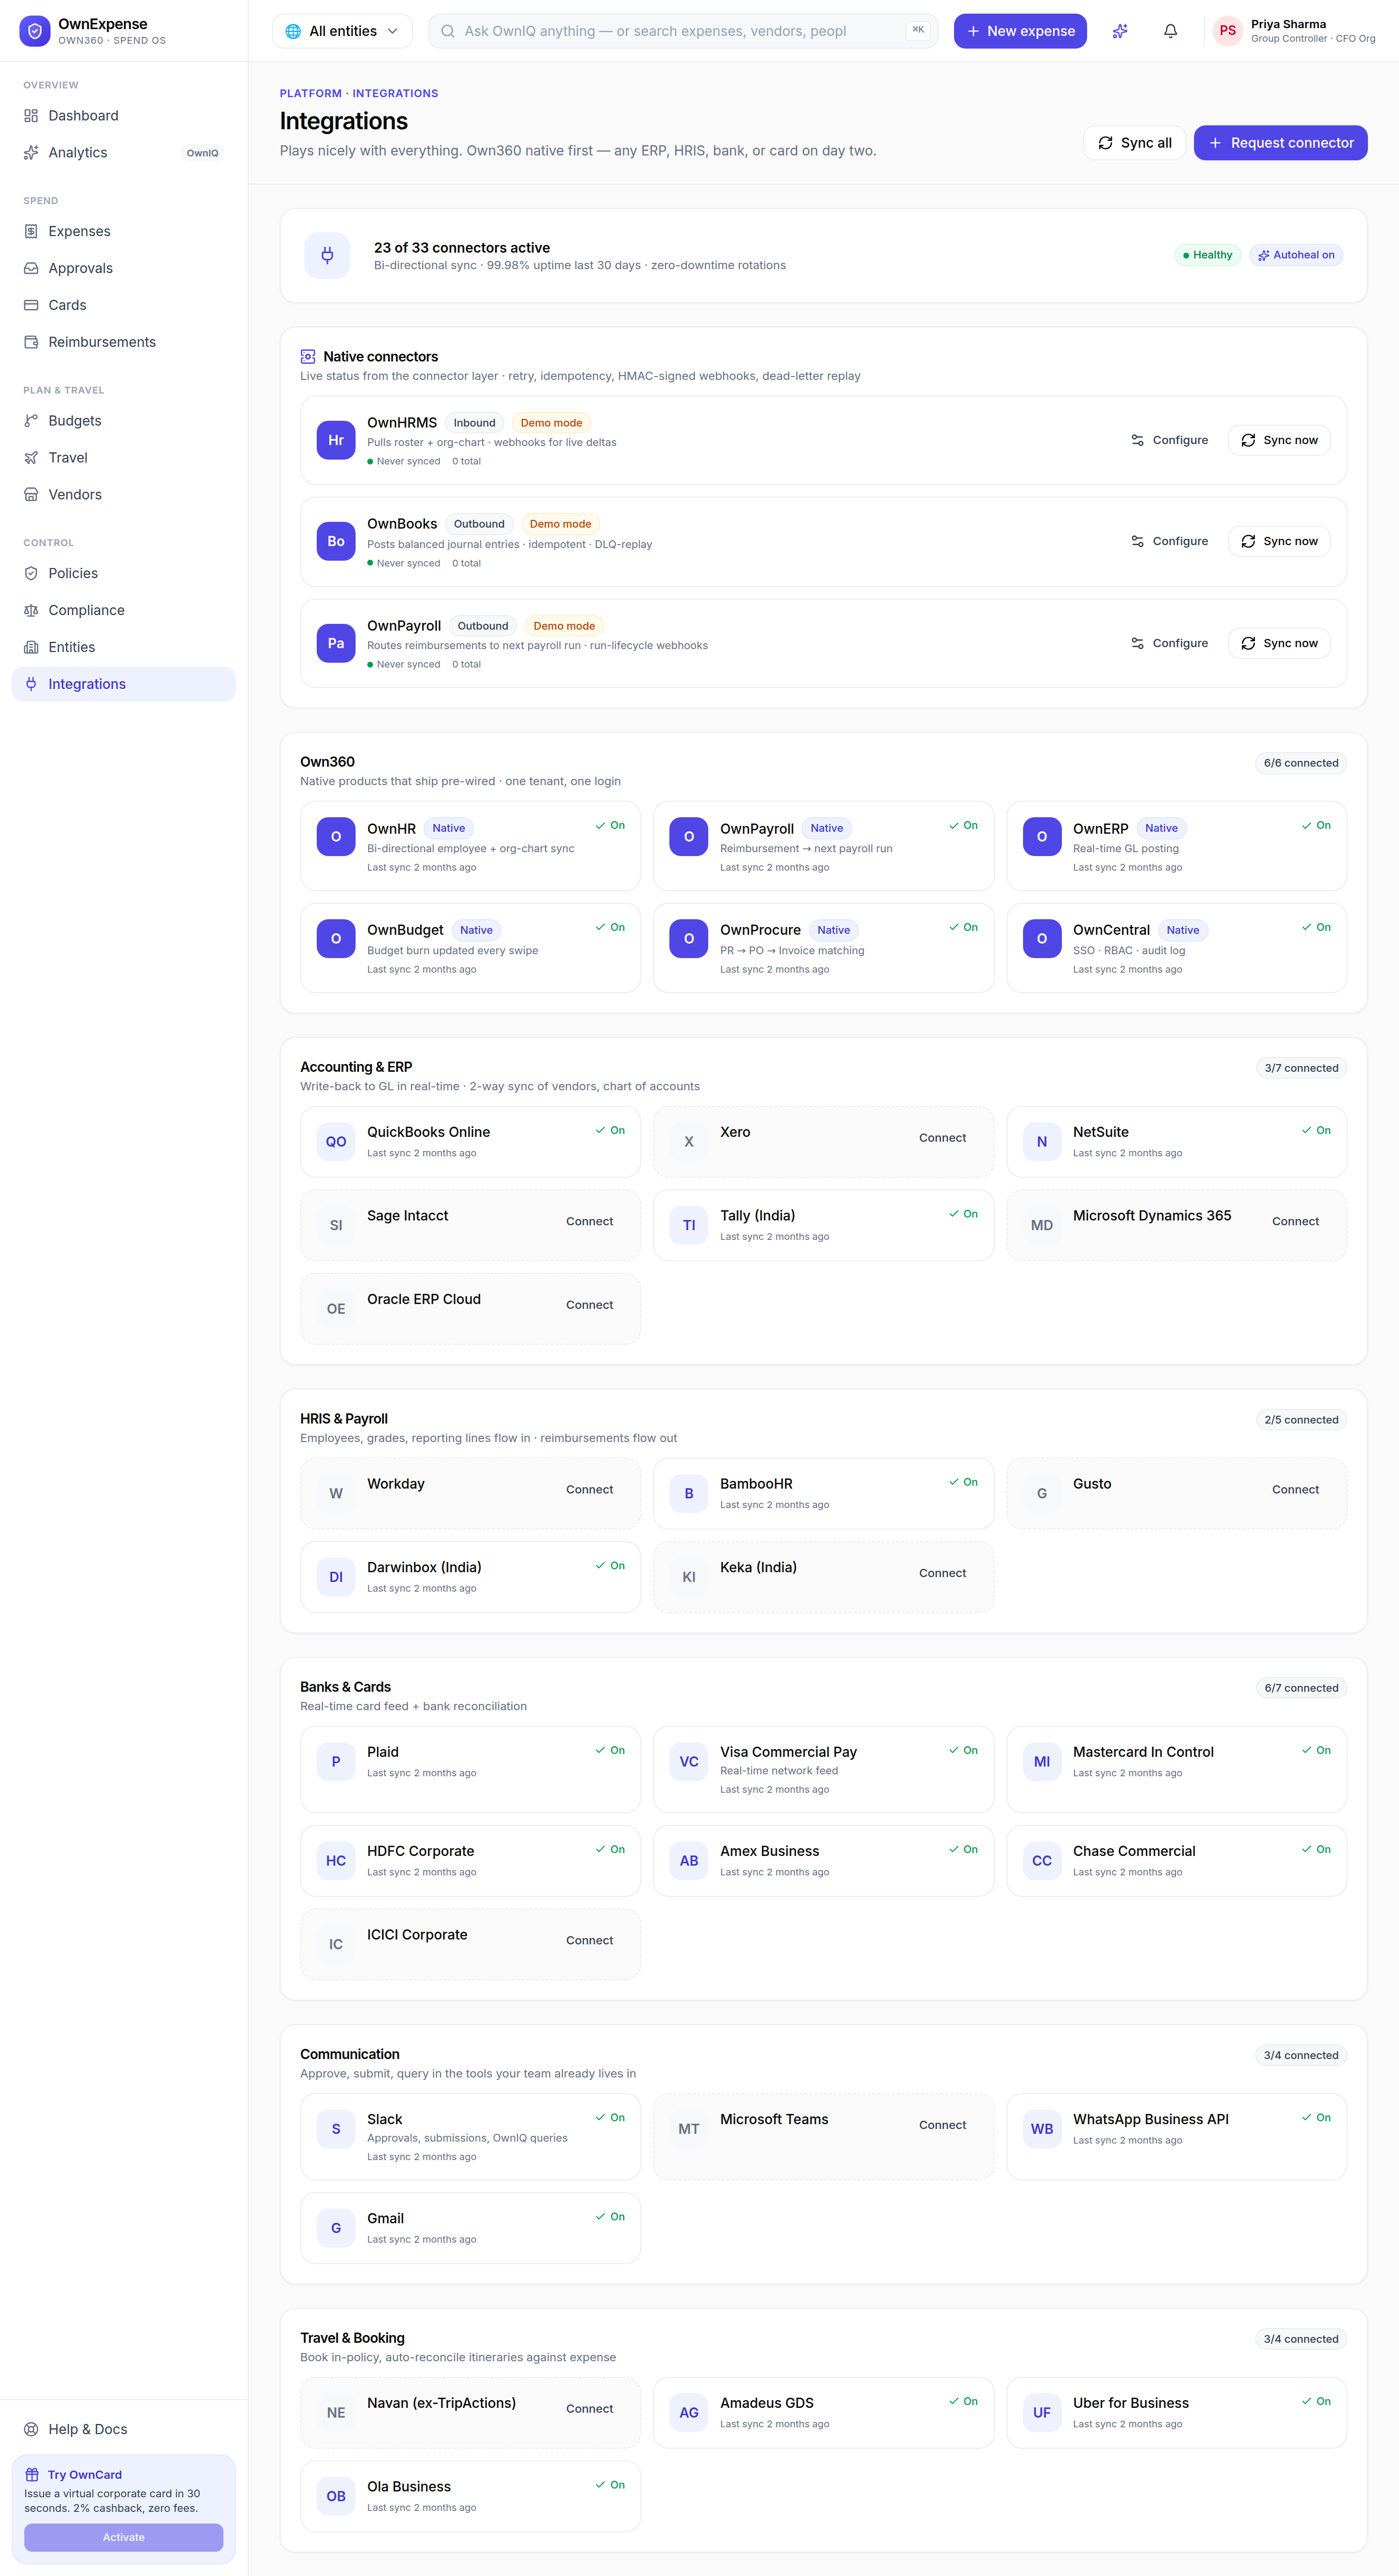
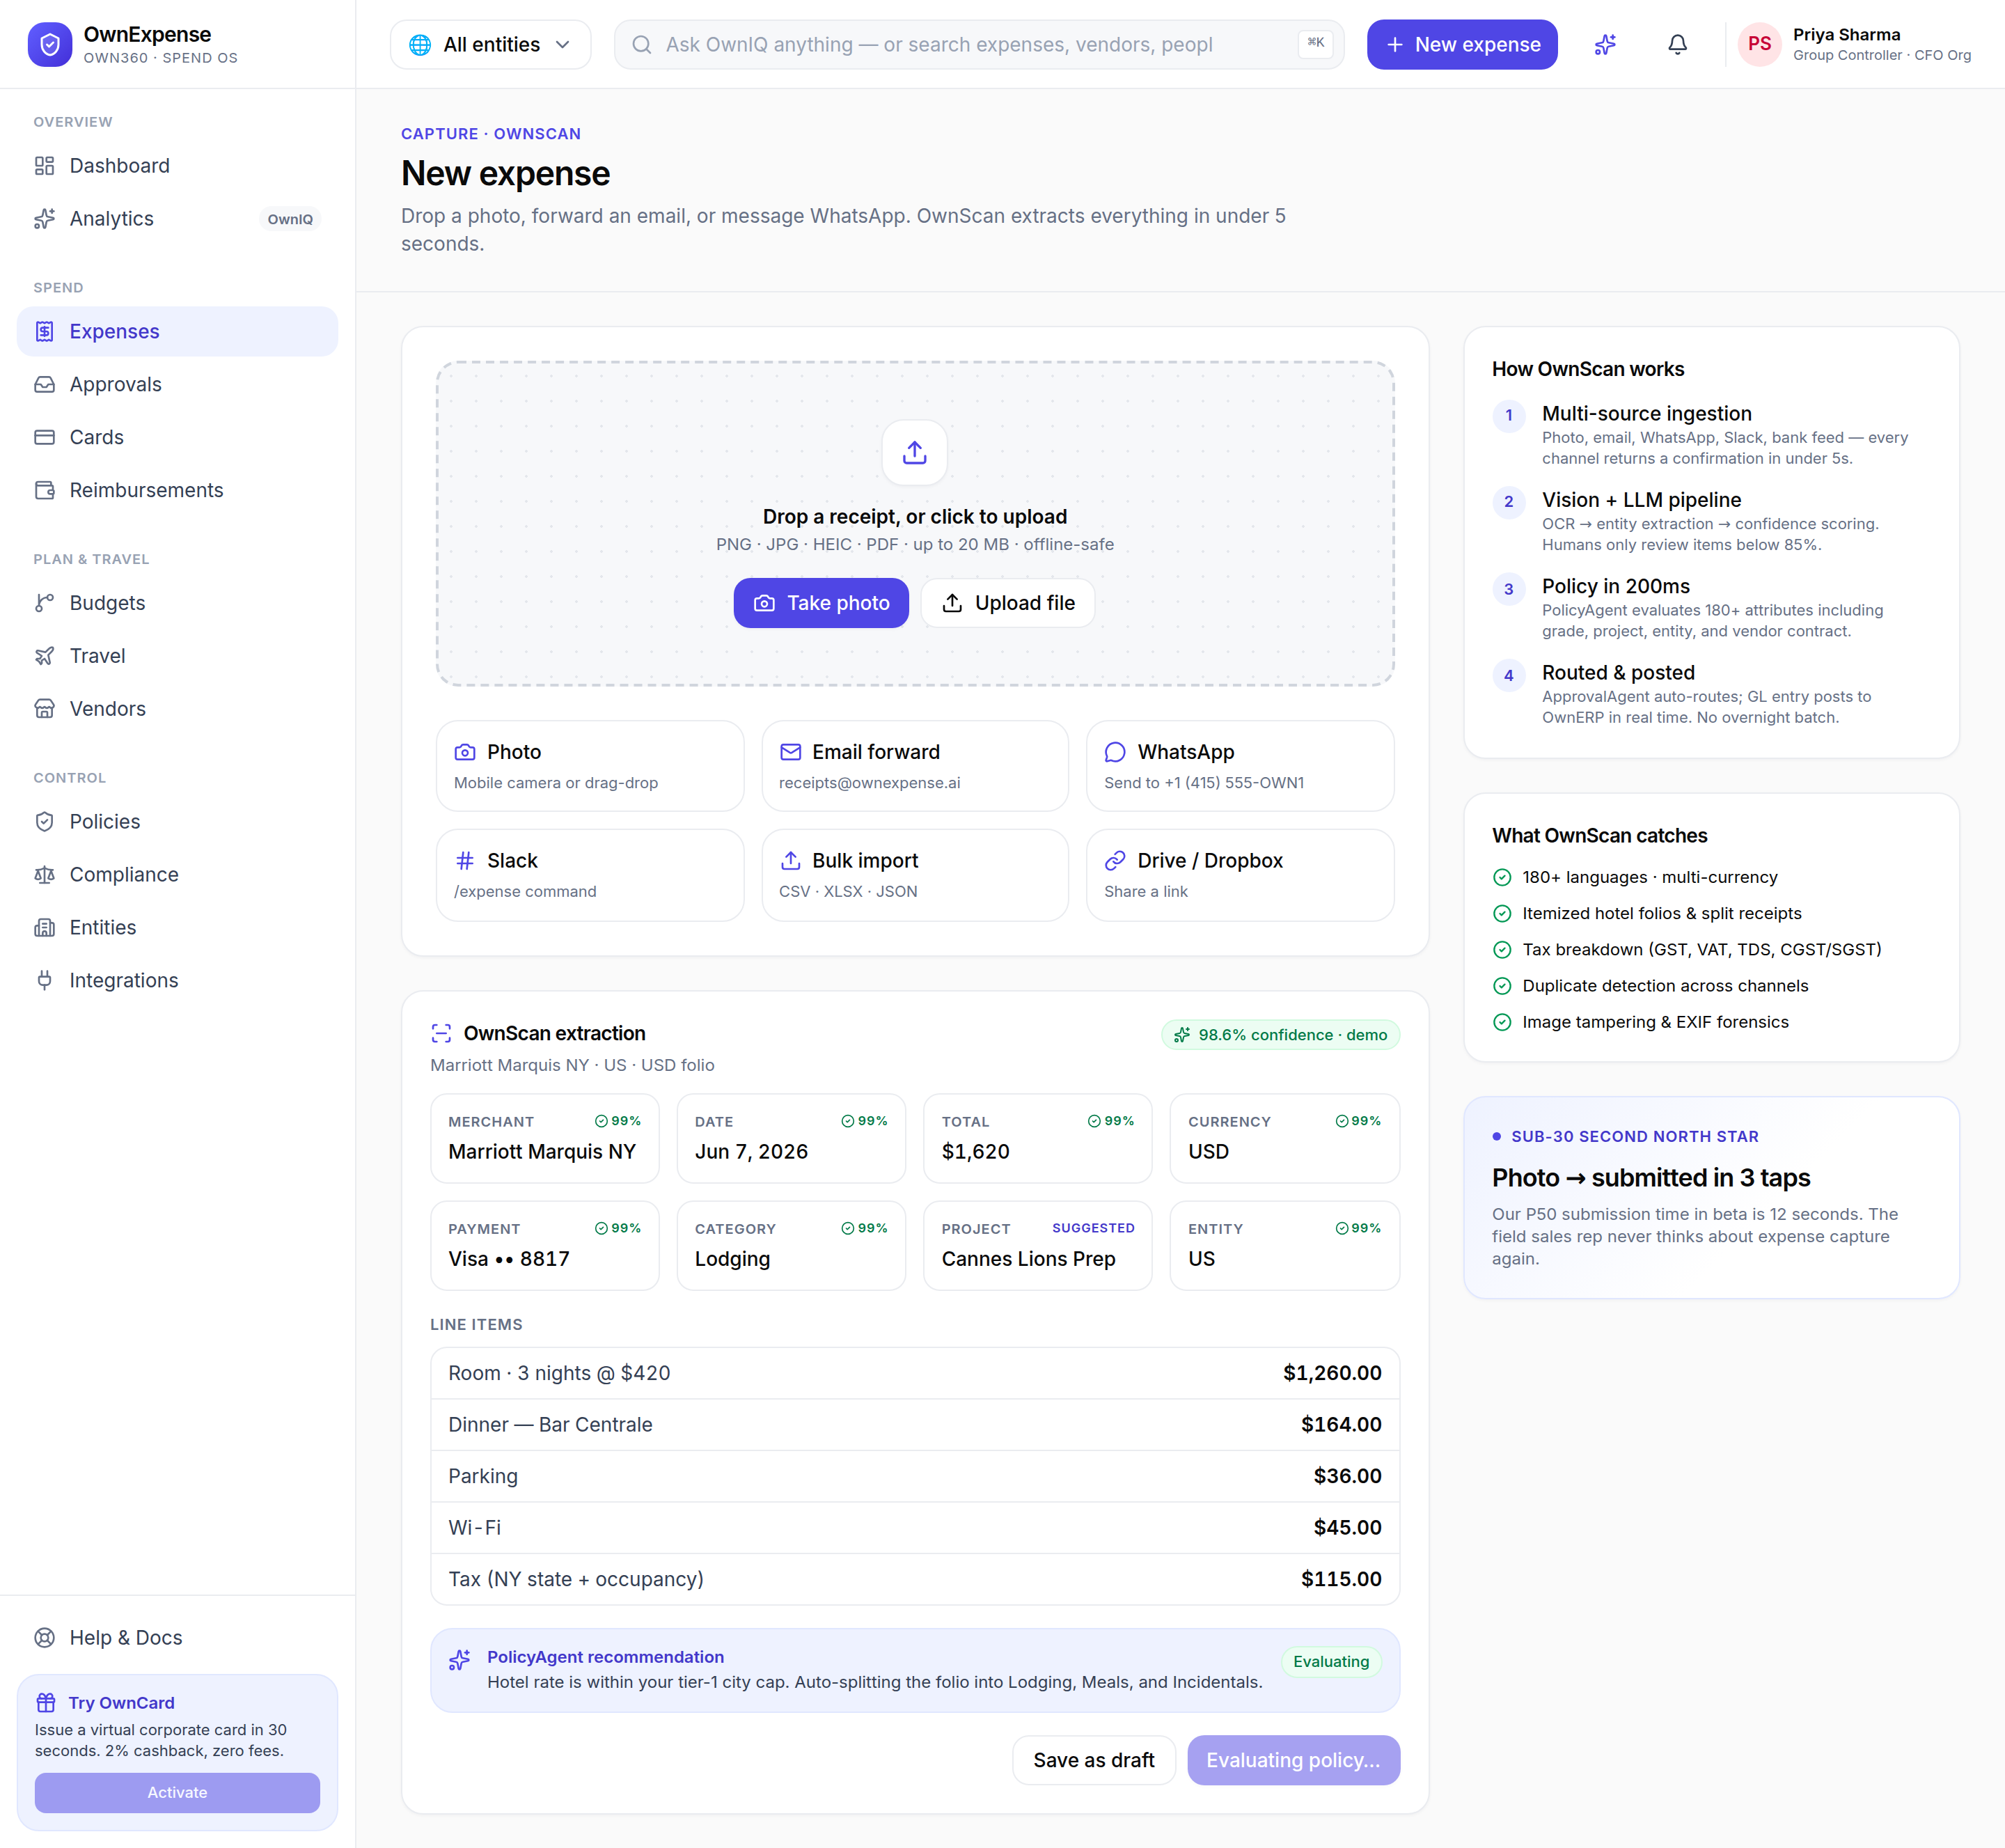
OwnExpense is part of the Own360 System of Action, so you can describe an outcome in plain English and have AI carry it out as real actions in the app β€” not just chat about it. A central runtime, OwnAgents, accepts a task, pins it to the apps it is allowed to touch, and a supervisor routes the expense parts of the work to OwnExpense's headless surface (the same create/read/approve operations the UI uses). Every step reasons through OwnIQ, Own360's sovereign AI gateway, which keeps inference inside your perimeter, runs bound by your permissions, and writes an audit log of what was decided and done. OwnExpense also ships its own in-app AI you use directly: OwnScan (receipt capture and OCR), the PolicyAgent reasoning shown on capture and on every expense, and OwnIQ-backed analytics and CFO insights. This section explains what the agents can do, how to use them, and how to verify the results.

Where to find it: Agent tasks arrive via the Own360 runtime (OwnAgents β†’ OwnExpense headless surface). The in-app AI lives on New expense (OwnScan + PolicyAgent), every expense detail, and Analytics (Ask OwnIQ).
The New expense screen is the main in-app AI surface: OwnScan capture on the left, the live PolicyAgent recommendation below the extracted fields, and the OwnScan explainer on the right.

Step-by-step

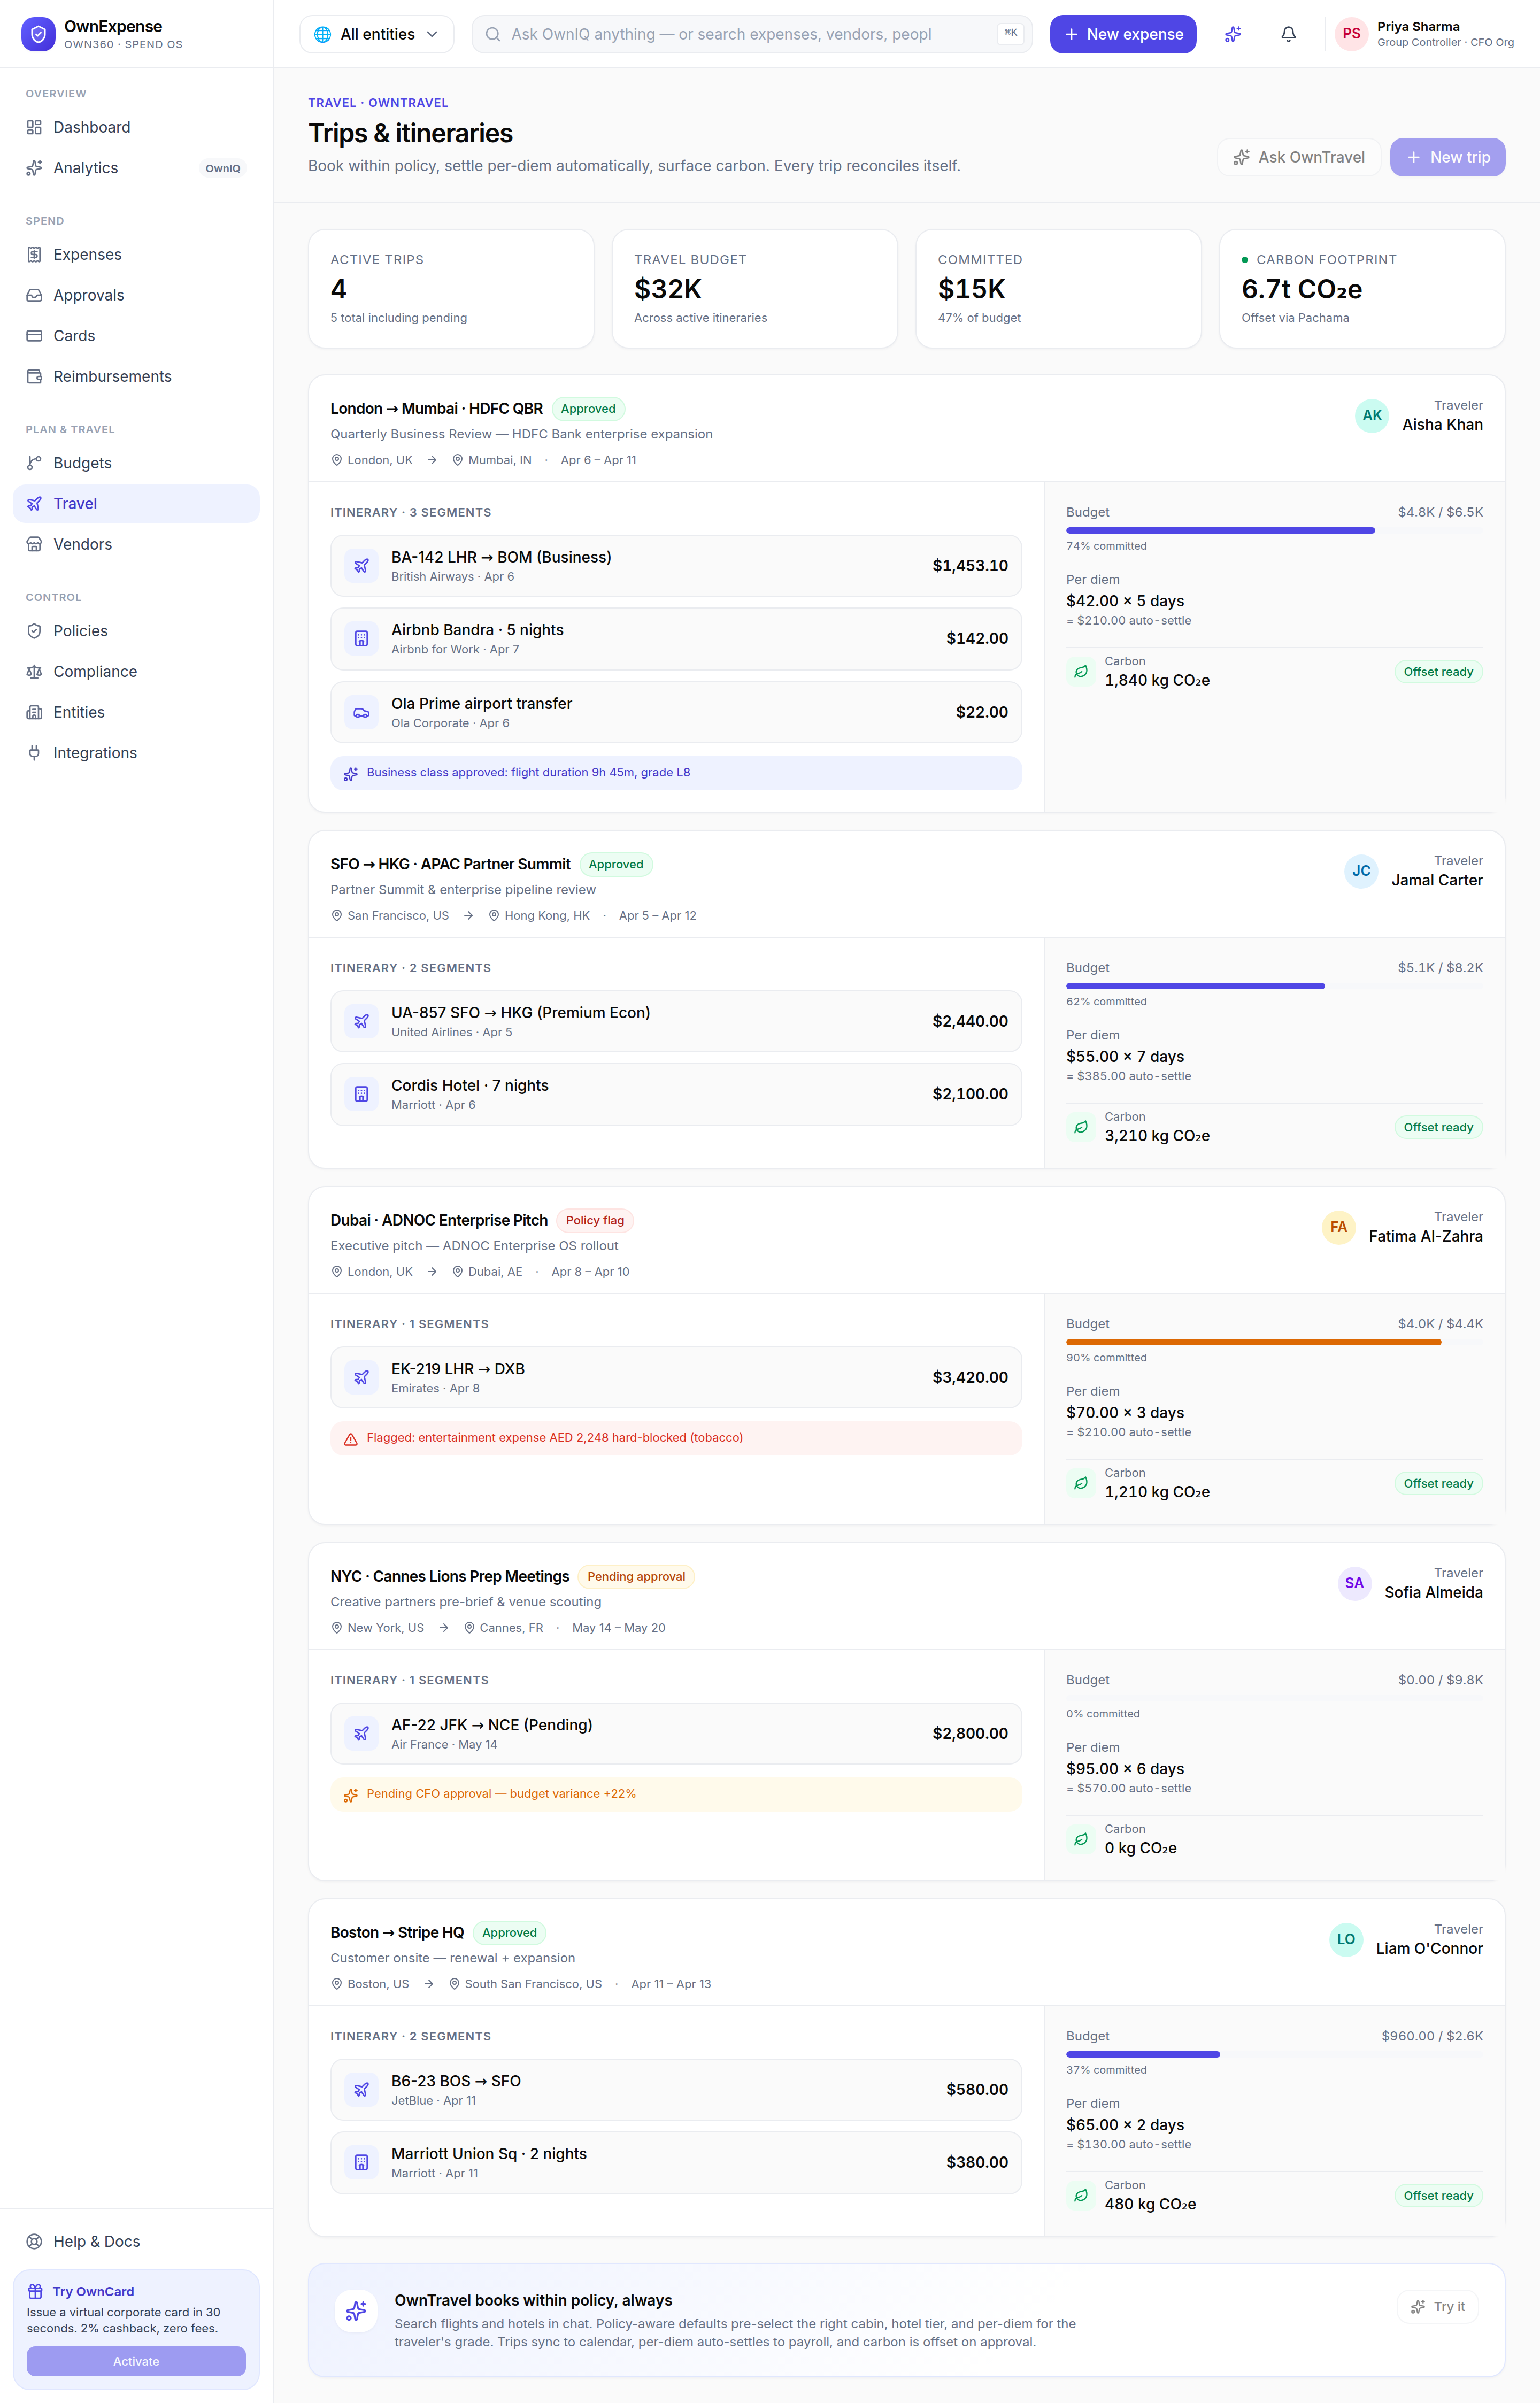
  1. 1Think in terms of outcomes: an agent task is a sentence describing what you want done (for example, "Submit an expense report 'Customer trip BLR' totalling $1,250 with three items…"), not a sequence of clicks.
  2. 2When dispatched through Own360, the OwnAgents runtime pins the task to the allowed apps and the supervisor routes the expense work to OwnExpense's headless surface β€” the same operations (create report, add line items, submit, approve) that the screens use.
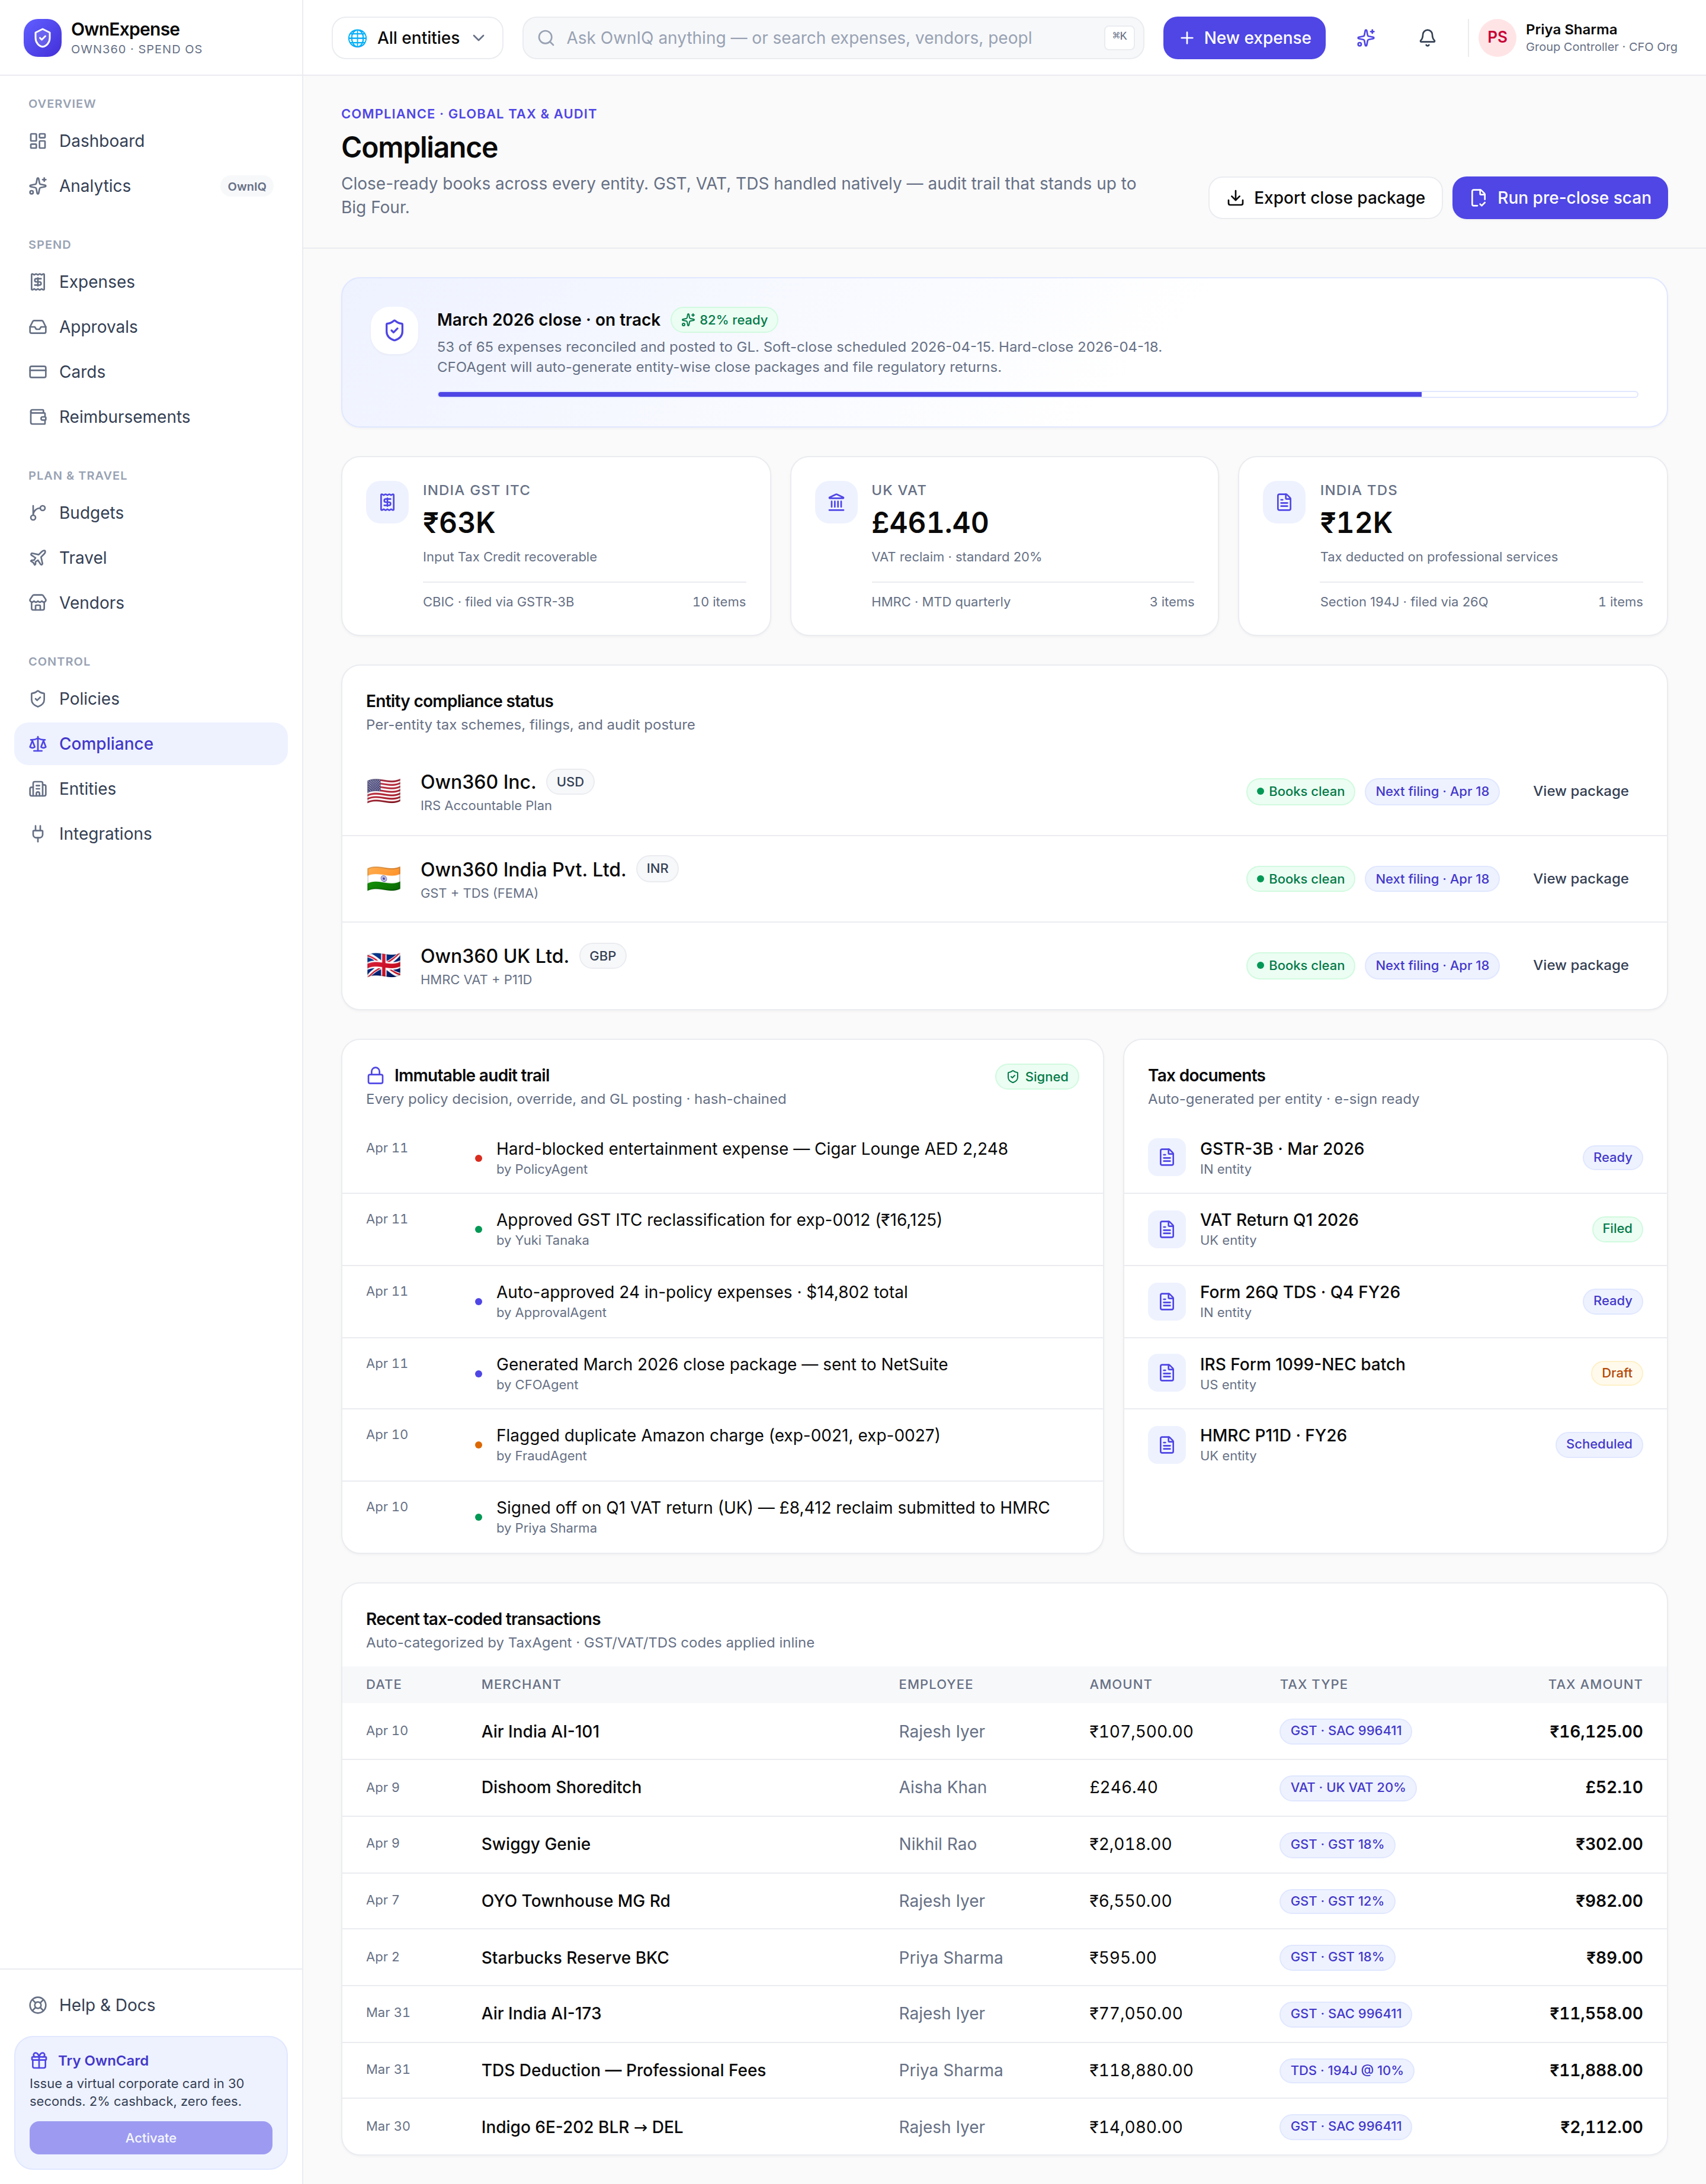
  3. 3The agent reasons through OwnIQ, which stays in-perimeter, runs within your permissions, and logs every decision and action for audit.
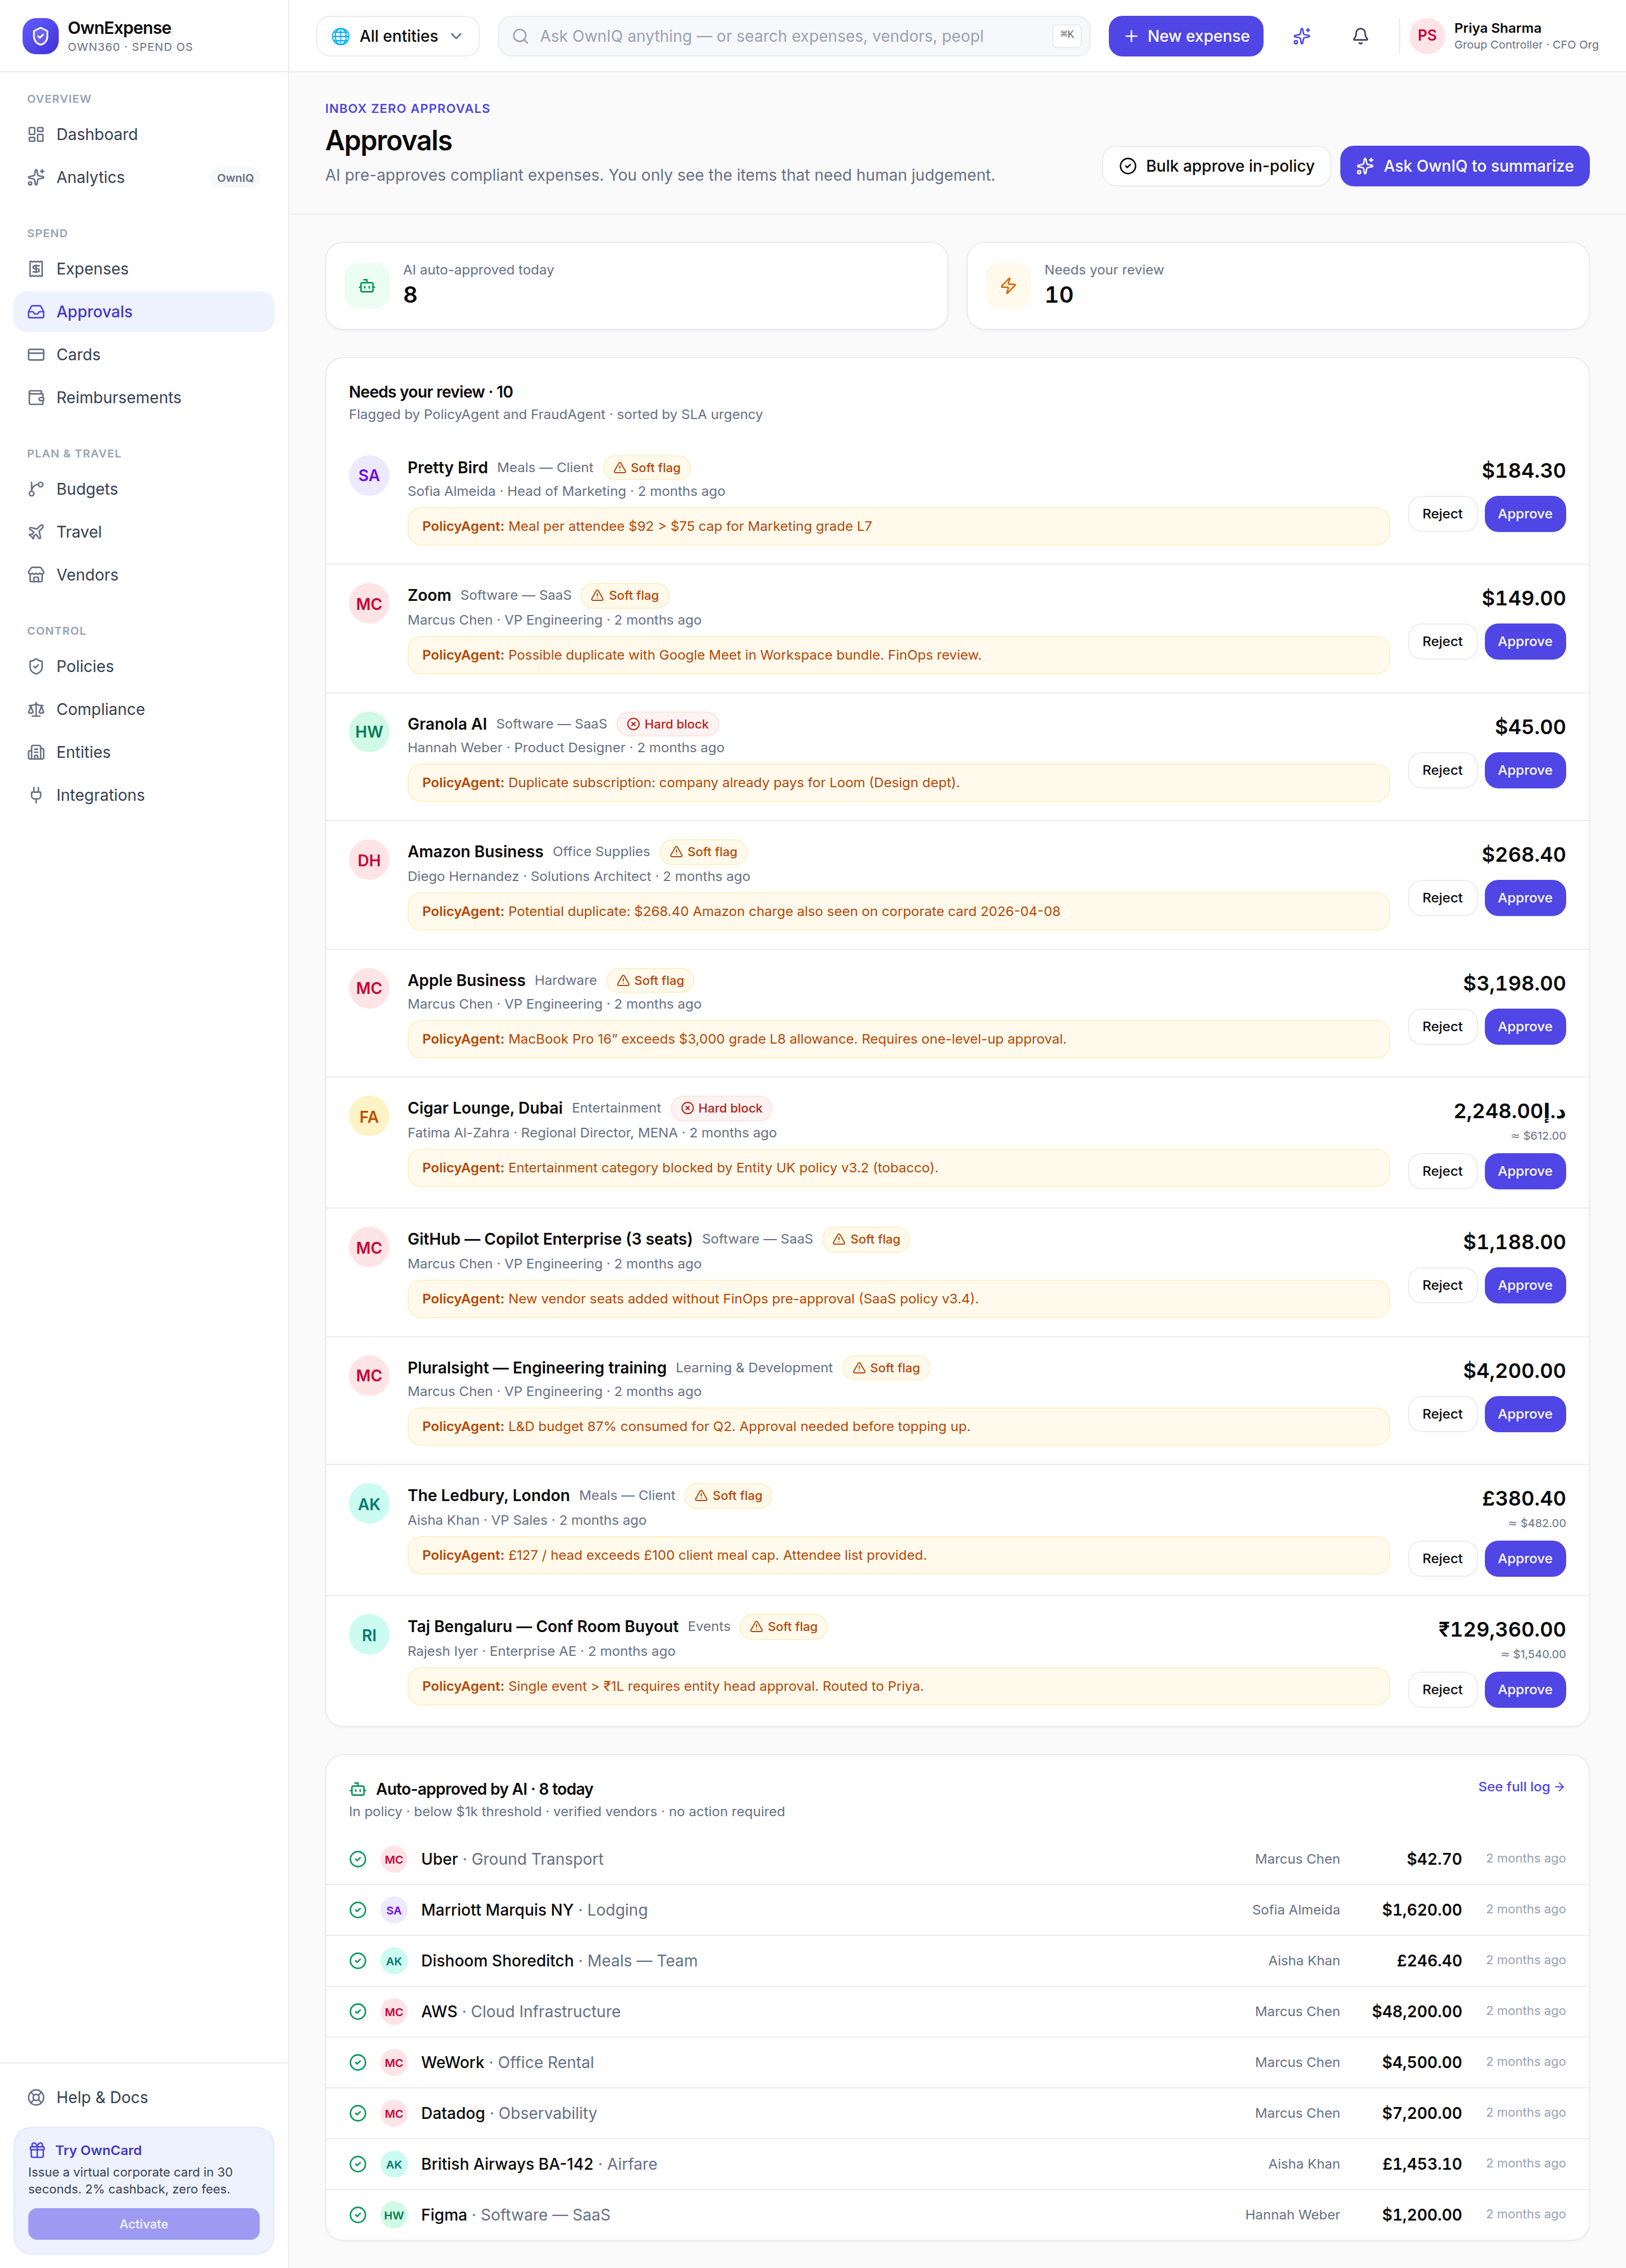
  4. 4To use AI yourself inside the app, open New expense (OwnScan + PolicyAgent), any expense's detail (PolicyAgent reasoning + FraudAgent), or Analytics (Ask OwnIQ) β€” covered in the topics below.
  5. 5Always confirm the result on the real screens (the created report, its line items, and the policy/audit trail) before treating a task as done β€” see "Verify agent results".

Tips & pitfalls

  • β€’Agents act through the same permission-checked operations you do β€” they cannot do anything your own account is not allowed to do.
  • β€’If OwnIQ is not configured for a deployment, live model answers degrade gracefully (Analytics shows an honest "OwnIQ is not configured" state and offline answers); the deterministic PolicyAgent and the curated surfaces still work so you are never shown fabricated AI output.

What the agents can do

Agents and the in-app AI in OwnExpense map to concrete operations on real entities β€” expenses, reports, receipts, categories, approvals, policies, and reimbursements. The list below is grounded in OwnExpense's headless surface and the in-app AI routes, so it reflects what the system can actually do today rather than aspirational features. Capabilities are permission-bound: an agent can only perform an action your account is authorized to perform.

Where to find it: Capabilities are exposed through the OwnExpense headless surface (submit report, approve expense) and the in-app AI surfaces (OwnScan, PolicyAgent, FraudAgent, ReceiptChaseAgent, Ask OwnIQ, CFOAgent).
An expense detail showing several agents at once: PolicyAgent reasoning, the ApprovalAgent-routed timeline, FraudAgent anomaly scoring, and the posted GL entry.

Step-by-step

  1. 1Capture a receipt (OwnScan): extract merchant, date, amount, currency, tax, and line items from a photo, email, WhatsApp, Slack, bulk import, or link.
  2. 2Submit an expense or a multi-line expense report β€” for example a trip report with flight, hotel, and meals line items under a single category.
  3. 3Policy-check (PolicyAgent): evaluate an expense against your active rules, grade, and entity and return allow / soft-flag / hard-block with plain-English reasoning and rule citations.
  4. 4Categorize and tag: auto-assign category, project, and tax treatment (GST/VAT/TDS) from the extracted receipt.
  5. 5Score for fraud (FraudAgent): compute an anomaly score across duplicate, velocity, vendor, and policy signals, with the evidence behind it.
  6. 6Route and approve: ApprovalAgent routes by amount, grade, and entity; in-policy items can be auto-approved and the rest queued for human review, and an authorized reviewer can approve or reject a report.
  7. 7Chase missing receipts (ReceiptChaseAgent): draft a nudge to the submitter when a receipt is still missing.
  8. 8Analyze spend (Ask OwnIQ + CFOAgent): answer plain-English spend questions and surface proactive savings/risk insights and forecasts.

Tips & pitfalls

  • β€’Hard-block is a real guardrail: a hard-blocked expense cannot be submitted or approved until the underlying policy violation is resolved β€” agents respect the same block.
  • β€’Stick to what is listed here when you brief an agent. Asking for an action the headless surface does not expose will not silently invent a result.

How to use the agents (worked example)

Here is the end-to-end flow using the real in-app AI, working the representative cohort task: submit an expense report "Customer trip BLR" totalling $1,250 with three items (flight $800, hotel $400, meals $50), category Travel. The same task can be dispatched to OwnAgents as one sentence; below you do it through the UI so you can see exactly what an agent proposes and confirm it before anything is committed. The key habit is reviewing the proposed action β€” the OwnScan extraction and the PolicyAgent recommendation β€” before you submit.

Where to find it: Sidebar β†’ Spend β†’ Expenses β†’ New expense (or the top-bar "New expense" button) β†’ /expenses/new; analytics via Sidebar β†’ Overview β†’ Analytics.
Ask OwnIQ on the Analytics page: a plain-English question returns a narrative answer with metrics. Note the honest offline/CFOAgent states when OwnIQ is not configured.

Step-by-step

  1. 1Open New expense from the top-bar "New expense" button or from the Expenses page.
  2. 2Capture the receipts: click "Upload file" (or drag a receipt onto the dashed area) for the flight, hotel, and meals. OwnScan reads each receipt and fills in merchant, date, amount, currency, tax, and line items.
  3. 3Review the proposed extraction in the "OwnScan extraction" card β€” check the merchant, total, currency, category (Travel), and the line items before doing anything else.
  4. 4Read the PolicyAgent recommendation card just below: it shows allow / soft-flag / hard-block with plain-English reasoning, rule citations, and the model + latency. This is the proposed action you are approving.
  5. 5If everything looks right and the policy outcome is not a hard-block, click "Submit expense". (The Submit button stays disabled until the PolicyAgent decision arrives, so you never submit ahead of the check.)
  6. 6Repeat for each line so the trip totals $1,250 β€” flight $800, hotel $400, meals $50 β€” all under category Travel, captured as the "Customer trip BLR" report.
  7. 7To brief an agent instead of clicking, phrase the whole thing as one task β€” "Submit an expense report 'Customer trip BLR' totalling $1,250 with three items (flight $800, hotel $400, meals $50), category Travel" β€” and dispatch it through Own360; the agent performs the same submit-report and add-line-item operations.
  8. 8Optionally open Analytics and ask OwnIQ a question about the trip (e.g. spend by project) to sanity-check the numbers.

Tips & pitfalls

  • β€’Always review before you submit. OwnScan flags any field below 85% confidence for a human look, and the PolicyAgent recommendation is shown before submission precisely so you can catch a wrong amount or category.
  • β€’If OwnScan cannot read a receipt, it says so honestly and does not fill the form from sample data β€” re-try the upload or enter the details manually.
  • β€’Live in-browser camera capture is on the roadmap; use "Upload file" to attach a photo today.

Verify agent results

Never treat an agent task as done until you have verified it on the real screens. Verification has three parts: confirm the entity that was created (the report and its line items), confirm the reasoning behind any policy outcome, and confirm the audit/run trail. If something is wrong, you correct it with the same approve/reject and edit actions you would use for any expense β€” the agent does not get the last word.

Where to find it: Sidebar β†’ Spend β†’ Expenses β†’ click the row β†’ expense detail (/expenses/[id]); the run/audit output is returned by the OwnAgents run and mirrored in the expense's history and PolicyAgent trace.
Verification surface: PolicyAgent reasoning with evaluation time and rule-set version, the approval timeline, FraudAgent scoring, and the GL posting β€” everything you need to confirm a result.

Step-by-step

  1. 1Open Expenses and find the item the agent created (e.g. the "Customer trip BLR" report); click the row to open its detail.
  2. 2Check the entity is correct: total (with FX), category, entity, and the individual line items match what you asked for.
  3. 3Read the PolicyAgent reasoning box β€” it states the outcome, the plain-English rationale, the evaluation time, the rule-set version, and notes that the trace is logged for audit.
  4. 4Walk the approval timeline to see how ApprovalAgent routed the item (captured β†’ policy evaluated β†’ auto-approved or queued for review) and review the FraudAgent score and its evidence.
  5. 5Confirm the run/audit output: the OwnAgents run returns what it did, and the same is reflected in the expense's history and the policy trace β€” use the "History" action to see the audit events on file.
  6. 6Correct a wrong result: if the outcome is wrong, click "Reject" (you will be asked for a reason that is sent back to the submitter) or "Approve" to override, then re-capture or edit the expense and let the PolicyAgent re-evaluate.

Tips & pitfalls

  • β€’A hard-blocked expense cannot be approved from the detail screen β€” the Approve button is hidden until the policy issue is resolved, so a bad agent result cannot be rubber-stamped.
  • β€’If the audit/run trail shows a fallback or an "OwnIQ not configured" note, the live model did not run β€” trust the deterministic policy outcome but re-run with OwnIQ configured if you need a model-generated narrative.
  • β€’Rejections require a non-empty reason on purpose, so the correction is always recorded and communicated.

Overview & Insights

Your spend posture at a glance, plus natural-language analytics.

Dashboard

The Dashboard is your landing page. It summarizes spend across the selected entity (or all entities) with KPI cards, a spend-burn chart against plan, a category breakdown donut, and a live feed of what the AI agents (PolicyAgent, FraudAgent, CFOAgent) have been doing β€” so you can spot what needs attention without digging.

Where to find it: Sidebar β†’ Overview β†’ Dashboard (/dashboard)
The Dashboard: KPI cards, spend-burn chart, category donut, and the live agent activity feed.

Step-by-step

  1. 1Open Dashboard from the top of the sidebar.
  2. 2Use the entity switcher in the top bar to scope the figures to one legal entity or to all entities.
  3. 3Scan the KPI cards for headline spend, and read the spend-burn chart to see actuals against plan.
  4. 4Check the category donut to see where money is going by category.
  5. 5Review the agent activity feed to see auto-approvals, policy flags, and CFO insights as they happen.

Tips & pitfalls

  • β€’The entity switcher in the top bar filters the whole app, not just the Dashboard β€” set it once and every page follows.

Analytics (Ask OwnIQ)

Analytics is the OwnIQ-powered exploration surface. Type a spend question in plain English (e.g. "Engineering SaaS spend last quarter") and get charts, a written narrative, and suggested actions in seconds. The page also shows actual-vs-plan by department, a weekly spend heatmap, and proactive CFOAgent insights.

Where to find it: Sidebar β†’ Overview β†’ Analytics (/analytics), or the sparkle icon in the top bar
Analytics: a natural-language ask box, actual-vs-plan by department, the weekly spend heatmap, and CFOAgent insights.

Step-by-step

  1. 1Open Analytics from the sidebar (or click the OwnIQ sparkle in the top bar).
  2. 2Type a spend question into the ask box and submit it.
  3. 3Read the returned chart and narrative, and follow any suggested actions.
  4. 4Scroll to review actual-vs-plan by department, the weekly spend heatmap, and proactive CFOAgent insights.

Tips & pitfalls

  • β€’AI features degrade gracefully if the OwnIQ gateway is not configured β€” the curated charts and insights still render.
  • β€’You can also ask OwnIQ directly from the universal search box in the top bar.

Expenses & Capture

Capture receipts through any channel and review every expense.

Expenses list

The Expenses page is the master list of every expense across all 7 capture channels (card, photo, email, WhatsApp, Slack, mileage, per-diem). Each row shows the merchant, employee, project/notes, capture channel, the policy outcome, the amount (with USD conversion for foreign currency), and the date. Every expense is policy-checked in under 200ms.

Where to find it: Sidebar β†’ Spend β†’ Expenses (/expenses)
The Expenses list with search, Status / Policy / Channel / date filters, sort, Export, and the policy-coded table.

Step-by-step

  1. 1Open Expenses from the sidebar.
  2. 2Use the search box to filter by merchant, project, employee, or amount.
  3. 3Narrow results with the Status, Policy, Channel, and date-range dropdowns; the active filter count appears so you can Clear them.
  4. 4Use the sort dropdown to order by newest/oldest, amount, or merchant.
  5. 5Click any row to open that expense's detail view.
  6. 6Click "Export" to download the currently filtered expenses as a CSV.

Tips & pitfalls

  • β€’The results counter on the right shows how many expenses match and their total in USD β€” handy after filtering.
  • β€’The CSV export reflects your active filters, so filter first, then export exactly the slice you need.

New expense (capture)

The New expense page is the capture surface, powered by OwnScan. Drop or upload a receipt photo and OwnScan extracts the merchant, amount, tax, and line items for you. You can also forward receipts by email, send them over WhatsApp or Slack, bulk-import a spreadsheet, or share a Drive/Dropbox link β€” all funnel into the same review flow.

Where to find it: Sidebar β†’ Spend β†’ Expenses β†’ New expense, the top-bar New expense button, or /expenses/new
New expense: the OwnScan capture surface with Upload, plus Photo, Email forward, WhatsApp, Slack, Bulk import, and Drive/Dropbox channels.

Step-by-step

  1. 1Open New expense via the "New expense" button (top bar or the Expenses page).
  2. 2Click "Upload file" to pick a receipt image, or drag a receipt onto the capture surface.
  3. 3OwnScan reads the receipt and fills in the merchant, amount, tax, and line items.
  4. 4Alternatively pick another channel β€” Email forward (receipts@ownexpense.ai), WhatsApp, Slack (/expense), Bulk import (CSV/XLSX/JSON), or Drive/Dropbox link.
  5. 5Review the extracted details and confirm to submit the expense for policy checking.

Tips & pitfalls

  • β€’Forwarding receipts to receipts@ownexpense.ai or sending them on WhatsApp/Slack means an expense is created without ever opening the app.
  • β€’Live in-browser camera capture is on the roadmap β€” use Upload to attach a photo today.

Expense detail & policy reasoning

The expense detail view shows everything about a single expense: the total (with mid-market FX conversion), the policy outcome and the PolicyAgent's plain-English reasoning, the capture method and entity, line items, and the receipt. From here a reviewer can approve or reject the expense β€” unless it is a hard policy block or already in a final state.

Where to find it: Click any expense row on the Expenses list (/expenses/[id])
An expense detail view: total with FX, policy badge, PolicyAgent reasoning, and Approve / Reject actions.

Step-by-step

  1. 1Open an expense by clicking its row in the Expenses list.
  2. 2Review the total, policy badge, status, method, and entity at the top.
  3. 3Read the PolicyAgent reasoning box to understand any soft flag or block, including the rule set and evaluation time.
  4. 4Click "Approve" to clear an in-policy or soft-flagged expense, or "Reject" to send it back.
  5. 5Use "Back" to return to the Expenses list.

Tips & pitfalls

  • β€’Hard-blocked expenses cannot be approved from here β€” the Approve button is hidden until the underlying policy issue is resolved.
  • β€’Once an expense is in a final state (approved, reimbursed, or rejected) the action buttons are replaced by a status badge.

Approvals & Reimbursements

Review the exceptions AI flags, then settle out-of-pocket spend.

Approvals

Approvals is your inbox-zero queue. AI auto-approves compliant expenses, so you only see the items PolicyAgent and FraudAgent flagged for human judgement, sorted by SLA urgency. The page shows how many expenses were auto-approved today versus how many need your review, then lists the items to act on.

Where to find it: Sidebar β†’ Spend β†’ Approvals (/approvals)
Approvals: auto-approved vs. needs-review stats, and the queue of flagged expenses to act on.

Step-by-step

  1. 1Open Approvals from the sidebar.
  2. 2Check the two stat strips β€” "AI auto-approved today" and "Needs your review" β€” to gauge your queue.
  3. 3Review each item in the "Needs your review" list, flagged by PolicyAgent and FraudAgent and sorted by SLA urgency.
  4. 4Approve or reject items individually, or open one to inspect its detail.
  5. 5Click "Bulk approve in-policy" to clear all in-policy items at once.
  6. 6Use "Ask OwnIQ to summarize" to get a quick summary of the queue.

Tips & pitfalls

  • β€’Because AI pre-approves compliant spend, an empty queue is the goal β€” not a sign something is broken.
  • β€’Bulk approve only touches in-policy items; soft-flagged ones still need a deliberate decision.

Reimbursements

Reimbursements settles out-of-pocket employee spend β€” next payroll or same-day via ACH, UPI, or SEPA, routed to the cheapest, fastest rail per entity. The page shows the amount queued for payment, paid this month, median cycle time, and the count awaiting review, plus the next payment batch.

Where to find it: Sidebar β†’ Spend β†’ Reimbursements (/reimbursements)
Reimbursements: queued vs. paid totals, median cycle time, and the next per-entity payment batch by rail.

Step-by-step

  1. 1Open Reimbursements from the sidebar.
  2. 2Review the stat cards: Queued for payment, Paid this month, Median cycle time, and Awaiting review.
  3. 3Check the payment-rails summary to see how the next batch routes per entity (ACH/UPI/SEPA).
  4. 4Click "Run batch now" to process the queued reimbursements immediately.
  5. 5Click "Release payments" to release the prepared batch.

Tips & pitfalls

  • β€’Reimbursements only covers out-of-pocket spend β€” card transactions reconcile automatically and never enter this queue.
  • β€’Rails are chosen automatically for the cheapest, fastest settlement per entity; you do not pick them manually.

Cards

Issue OwnCards or connect any existing corporate card.

Cards

The Cards page manages corporate cards. Issue a virtual OwnCard in seconds, or connect any existing Visa, Mastercard, or Amex with full feature parity and no pricing penalty. The page lists your cards with their recent activity so you can monitor card-based spend alongside everything else.

Where to find it: Sidebar β†’ Spend β†’ Cards (/cards)
Cards: issue an OwnCard or bring your own card, with each card's recent activity.

Step-by-step

  1. 1Open Cards from the sidebar.
  2. 2Review your existing cards and their recent transactions.
  3. 3Choose to issue a new OwnCard, or connect an existing Visa/Mastercard/Amex via the card-connector picker.
  4. 4Card transactions flow into Expenses automatically and are policy-checked like any other expense.

Tips & pitfalls

  • β€’Card-issuance and the connector picker are gated on those APIs being wired in this build β€” the buttons explain when they are no-ops.
  • β€’Bringing your own card keeps every OwnExpense feature; you do not lose functionality by not using OwnCard.

Budgets, Travel & Vendors

Forecast spend, manage trips and per-diems, and watch vendor spend.

Budgets

Budgets tracks spend against plan in real time β€” budget burn updates the moment a card is swiped. CFOAgent forecasts ahead and raises alerts when a budget is on track to overrun (at 80% confidence), so you catch overspend before it happens rather than at month-end.

Where to find it: Sidebar β†’ Plan & Travel β†’ Budgets (/budgets)
Budgets: real-time burn against plan with CFOAgent forecasts and overrun alerts.

Step-by-step

  1. 1Open Budgets from the sidebar.
  2. 2Review each budget's current burn against its plan.
  3. 3Watch CFOAgent forecasts to see which budgets are trending toward overrun.
  4. 4Act on alerts raised at 80% forecast confidence before the budget is breached.

Tips & pitfalls

  • β€’Use the entity switcher to view budgets for a single entity or consolidated across all entities.

Travel

Travel manages trips and itineraries. Book within policy, settle per-diems automatically, and see the carbon footprint of each trip. Each trip card shows its status β€” pending approval, policy flag, per-diem, or carbon-offset ready β€” so trips effectively reconcile themselves.

Where to find it: Sidebar β†’ Plan & Travel β†’ Travel (/travel)
Travel: trip cards with pending-approval, policy-flag, per-diem, and carbon-offset status.

Step-by-step

  1. 1Open Travel from the sidebar.
  2. 2Review your trips and itineraries, each with its status badges.
  3. 3Watch per-diems settle automatically and check the carbon footprint per trip.
  4. 4Resolve any trip showing a pending approval or policy flag.

Tips & pitfalls

  • β€’OwnTravel chat and trip drafting are gated on the OwnTravel booking service in this build β€” the actions note when they are no-ops.
  • β€’Per-diem amounts settle automatically, so travellers do not file separate meal expenses.

Vendor intelligence

Vendors gives you spend intelligence on the third parties you pay: duplicate-SaaS detection, price-inflation alerts, a renewal calendar, and concrete consolidation-savings recommendations β€” without leaving expense. It also ranks your top vendors by YTD spend and breaks vendor spend down by category.

Where to find it: Sidebar β†’ Plan & Travel β†’ Vendors (/vendors)
Vendor intelligence: duplicate-SaaS detection, consolidation savings, top vendors by YTD spend, and spend by category.

Step-by-step

  1. 1Open Vendors from the sidebar.
  2. 2Review flagged findings such as "Duplicate SaaS detected" with a ready action.
  3. 3Approve a consolidation recommendation to capture the savings, or dismiss it.
  4. 4Scan the top-vendors-by-YTD-spend and spend-by-category views.
  5. 5Click "Run scan" to re-run vendor intelligence, or add a new vendor.

Tips & pitfalls

  • β€’Duplicate-SaaS and price-inflation alerts are the fastest wins β€” they surface money you are already overspending.

Policies, Compliance & Entities

Author rules, stay tax/close-ready, and run every legal entity.

Policies

Policies is where you write the spend rules OwnExpense enforces. Rules are written in plain English and AI-graded at enforcement time. You can build them with drag-to-build, scope them by employee grade and by legal entity, and have AI draft a policy for you. These rules drive the policy outcomes you see throughout the app.

Where to find it: Sidebar β†’ Control β†’ Policies (/policies)
Policies: plain-English, AI-graded, grade-aware and entity-scoped spend rules.

Step-by-step

  1. 1Open Policies from the sidebar.
  2. 2Review existing policies and the grades/entities they apply to.
  3. 3Click "New policy" to author one, or "Draft with AI" to have OwnIQ propose a policy.
  4. 4Write the rule in plain English and scope it by grade and entity.
  5. 5Save the policy β€” it then drives the automatic policy checks on every expense.

Tips & pitfalls

  • β€’Because rules are entity- and grade-scoped, the same expense can be in-policy for one team and flagged for another.

Compliance & tax

Compliance keeps your books close-ready across every entity. GST, VAT, and TDS are handled natively, with an audit trail built to stand up to Big Four scrutiny. The page shows per-entity compliance status, tax documents, and recent tax-coded transactions, and lets you run a pre-close scan and export a close package.

Where to find it: Sidebar β†’ Control β†’ Compliance (/compliance)
Compliance: per-entity status, tax documents, and recent tax-coded transactions with GST/VAT/TDS.

Step-by-step

  1. 1Open Compliance from the sidebar.
  2. 2Review the entity compliance status grid and any recoverable tax (e.g. India GST input tax credit).
  3. 3Check tax documents and the recent tax-coded transactions table.
  4. 4Click "Run pre-close scan" to surface issues before closing the period.
  5. 5Click "Export close package" to produce the audit-ready package.

Tips & pitfalls

  • β€’Run the pre-close scan before each period close so tax-coding issues are caught while they are still easy to fix.

Entities

Entities lets you manage every legal entity from a single console: intercompany allocations, consolidated close, and FX-aware reporting. Add entities, auto-allocate shared costs across them, and report either per-entity or consolidated. The entity switcher in the top bar scopes the rest of the app to whichever entity you choose.

Where to find it: Sidebar β†’ Control β†’ Entities (/entities)
Entities: manage every legal entity, intercompany allocations, and FX-aware consolidated reporting.

Step-by-step

  1. 1Open Entities from the sidebar.
  2. 2Review your legal entities and their intercompany allocations.
  3. 3Click "Auto-allocate" to distribute shared costs across entities.
  4. 4Click "Add entity" to register a new legal entity.
  5. 5Use the top-bar entity switcher to scope the rest of the app to a single entity or view all consolidated.

Tips & pitfalls

  • β€’Reporting is FX-aware, so consolidated figures convert each entity's local currency automatically.

Integrations

Connect ERPs, HRIS, banks, and cards β€” Own360-native first.

Integrations

Integrations is the connector catalog. OwnExpense is Own360-native first (OwnBooks, OwnPayroll, OwnHRMS) and connects to any ERP, HRIS, bank, or card on day two. Each connector shows its health and last sync; you can sync everything at once, connect/disconnect individual connectors, and request a connector that is not yet listed.

Where to find it: Sidebar β†’ Control β†’ Integrations (/integrations)
Integrations: the connector catalog by category with health and last-sync, plus Sync all and Request connector.

Step-by-step

  1. 1Open Integrations from the sidebar.
  2. 2Browse connectors grouped by category and review each one's health and last sync.
  3. 3Expand a connector to connect or disconnect it.
  4. 4Click "Sync all" to refresh every connected integration at once.
  5. 5Click "Request connector" if the tool you need is not yet in the catalog.
  6. 6Click a connector to open its detail view (inbound/outbound/bi-directional, live or demo mode).

Tips & pitfalls

  • β€’Own360-native connectors (OwnBooks, OwnPayroll, OwnHRMS) are the deepest integrations β€” connect those first if you use them.
  • β€’A connector marked "Demo mode" is illustrative until its credentials are configured.